Spring Event là một cơ chế cho phép các component trong ứng dụng Spring giao tiếp với nhau theo mô hình Publish-Subscriber (hoặc Observer Pattern) mà không bị phụ thuộc trực tiếp (decoupled) vào nhau.
Thay vì Service A phải nhúng (inject) Service B, Service C, Service D vào để gọi trực tiếp, Service A chỉ cần bắn đi một Event (Publish). Các service khác muốn xử lý chỉ cần lắng nghe (Listen/Subscribe) event đó.
1. Spring Event?
1.1. Khi nào nên dùng Spring Event?
Bạn nên dùng Event khi muốn tách rời logic chính và logic phụ (decoupling):
-
Tách logic phụ thuộc: Sau khi UserService.register() tạo tài khoản thành công, bạn cần:
- Gửi email chào mừng.
- Tạo mã coupon giảm giá.
- Bắn notification về app.
- Gửi log sang hệ thống analytics.
(Nếu viết chung vào
UserServicethì class này sẽ cực kỳ phình to và vi phạm nguyên lý Single Responsibility).
-
Dễ mở rộng (Extensibility): Mai mốt dự án muốn làm thêm tính năng "
Tặng 100 điểm thưởng cho user mới", bạn chỉ cần tạo thêm 1 Listener mới mà không sửa 1 dòng code nào trongUserService.
1.2. Spring Event là Đồng bộ hay Bất đồng bộ?
MẶC ĐỊNH LÀ ĐỒNG BỘ (Synchronous)
Rất nhiều người nhầm tưởng Event là chạy ngầm/chạy riêng thread. Nhưng mặc định trong Spring:
- Publisher và Listener chạy chung 1 Thread.
- Nếu Listener bị chậm (vd: mất 3 giây gửi email), thì Publisher phải đứng chờ 3 giây đó rồi mới chạy tiếp.
- Nếu Listener bị quăng
RuntimeException, cả Publisher cũng sẽ bị dính Exception đó (và có thể bị Rollback Transaction nếu có@Transactional). - Muốn quy định Listener A chạy xong thì Listener B mới được chạy thì thêm
@Order(số). Số càng nhỏ thì chạy càng trước, có thể dùng giá trị âm.
@Component
public class UserNotificationListeners {

    // CHẠY ĐẦU TIÊN (Order = 1)
    @Order(1)
    @EventListener
    public void createWelcomeCoupon(UserRegisteredEvent event) {
        System.out.println("Step 1: Tạo coupon giảm giá cho user");
    }

    // CHẠY THỨ HAI (Order = 2)
    @Order(2)
    @EventListener
    public void sendWelcomeEmail(UserRegisteredEvent event) {
        System.out.println("Step 2: Gửi email chào mừng kèm coupon");
    }

    // CHẠY CUỐI CÙNG (Order = 3)
    @Order(3)
    @EventListener
    public void logAudit(UserRegisteredEvent event) {
        System.out.println("Step 3: Ghi log hoàn tất");
    }
}
1.3. @TransactionalEventListener
Đây là một annotation vô cùng quan trọng khi kết hợp giữa Spring Event và Database Transaction.
Vấn đề của @EventListener thường:
Giả sử trong UserService.register() (có @Transactional):
userRepository.save(user)-> Lưu DB.eventPublisher.publishEvent(...)-> Bắn Event.- Code ở dưới bị lỗi
RuntimeException-> Transaction củaUserServicebị Rollback (User chưa hề lưu vào DB). - Nhưng
@EventListenerđã lỡ chạy từ bước 2 và gửi Email chào mừng thành công --> Lỗi nghiệp vụ! (Email đã gửi nhưng User chưa được tạo).
Giải pháp với @TransactionalEventListener:
Nó giúp Listener chỉ kích hoạt dựa trên trạng thái của Transaction ở nơi bắn event.
@Component
public class NotificationListener {

    // Mặc định phase = TransactionPhase.AFTER_COMMIT
    @TransactionalEventListener
    public void handleUserRegistered(UserRegisteredEvent event) {
        // CHỈ CHẠY khi Transaction ở UserService đã COMMIT thành công vào DB
        emailService.sendWelcomeEmail(event.getUser());
    }
}
Các Phase hỗ trợ:
-
AFTER_COMMIT(Mặc định): Chỉ chạy sau khi Transaction commit thành công. -
AFTER_ROLLBACK: Chỉ chạy nếu Transaction bị rollback (thường dùng để ghi log lỗi, dọn dẹp file tạm...). -
AFTER_COMPLETION: Chạy sau khi Transaction hoàn tất (dù Commit hay Rollback). -
BEFORE_COMMIT: Chạy ngay trước khi Transaction commit.
2. The Scenario
When a new user registers, we want to perform two secondary tasks:
- Send a welcome email (slow operation $\rightarrow$ should run asynchronously).
- Log audit data (must only run after the database transaction succeeds).
2.1. Create the Event Object
An event is just a plain Java class carrying whatever payload the listeners need.
public class UserRegisteredEvent {
    private final String userId;
    private final String email;

    public UserRegisteredEvent(String userId, String email) {
        this.userId = userId;
        this.email = email;
    }

    public String getUserId() { return userId; }
    public String getEmail() { return email; }
}
2.2. Publish the Event
Use Spring's ApplicationEventPublisher to fire the event inside your business logic.
@Service
public class UserService {

    private final UserRepository userRepository;
    private final ApplicationEventPublisher eventPublisher;

    public UserService(UserRepository userRepository, ApplicationEventPublisher eventPublisher) {
        this.userRepository = userRepository;
        this.eventPublisher = eventPublisher;
    }

    @Transactional
    public void registerUser(String email, String password) {
        // 1. Save user to database
        User user = userRepository.save(new User(email, password));

        // 2. Publish event (Does NOT send email directly here)
        UserRegisteredEvent event = new UserRegisteredEvent(user.getId(), user.getEmail());
        eventPublisher.publishEvent(event);

        // 3. Any error happening here will trigger DB rollback
    }
}
2.3. Enable Async Processing
To run tasks on background threads, add @EnableAsync to your main class or any @Configuration class:
@Configuration
@EnableAsync
public class AsyncConfig {
    // Basic setup: Spring will use a SimpleAsyncTaskExecutor by default,
    // or you can configure a custom ThreadPoolTaskExecutor bean here.
}
2.3.1. Enable Virtual Thread via application.properties
If using Spring Boot 3.2+ and Java 21+ then enable virtual threads via application.properties.
spring.threads.virtual.enabled=trueWhen this configuration is enabled, Spring automatically configures @Async, and the default Task handlers switch to using the Virtual Thread Executor without you needing to write any additional Java code.
2.3.2. Custom Bean Virtual Thread Executor manually
@Configuration
@EnableAsync
public class AsyncVirtualThreadConfig {

    @Bean(name = "virtualThreadExecutor")
    public Executor virtualThreadExecutor() {
        // Tạo Executor sử dụng Virtual Thread cho từng task
        return Executors.newVirtualThreadPerTaskExecutor();
    }
}
Use
@Async("virtualThreadExecutor")
public void handleAsyncTask(...) {
    // Chạy trên Virtual Thread! Cực kỳ nhẹ và tối ưu I/O.
}
2.4. Enable Async Processing
Now create components to listen for UserRegisteredEvent.
@Component
public class UserRegisteredEventListener {

    private static final Logger log = LoggerFactory.getLogger(UserRegisteredEventListener.class);

    // =========================================================================
    // LISTENER 1: Synchronous & Simple
    // Runs on the SAME thread as UserService, immediately when publishEvent is called.
    // =========================================================================
    @EventListener
    public void handleSyncLogging(UserRegisteredEvent event) {
        log.info("[SYNC] Event received for user: {}", event.getEmail());
    }

    // =========================================================================
    // LISTENER 2: Recommended Production Pattern for Emails/Push Notifications
    // - AFTER_COMMIT: Waits until the database transaction is 100% successful.
    // - @Async: Runs in a background thread pool so API response stays fast.
    // =========================================================================
    @Async
    @TransactionalEventListener(phase = TransactionPhase.AFTER_COMMIT)
    public void handleAsyncEmailNotification(UserRegisteredEvent event) {
        log.info("[ASYNC] Sending welcome email to {} on thread {}",
                 event.getEmail(), Thread.currentThread().getName());

        // Simulate email delay
        try { Thread.sleep(2000); } catch (InterruptedException ignored) {}

        log.info("[ASYNC] Email successfully sent to {}", event.getEmail());
    }
}
Flow Execution Summary
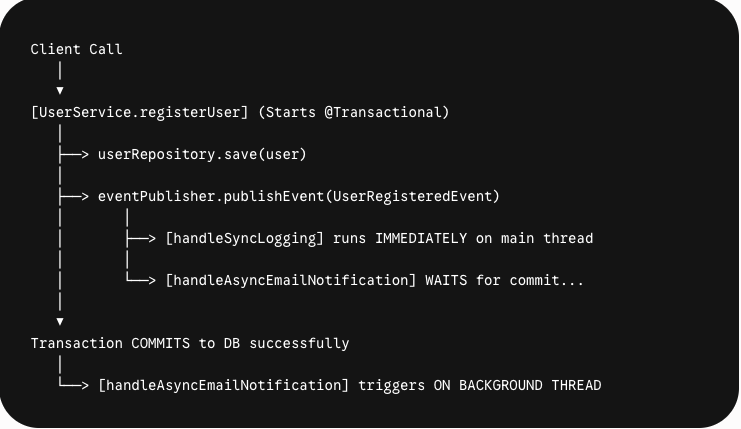
Important Gotcha with @TransactionalEventListener
If your listener method annotated with @TransactionalEventListener needs to write back to the database, you must use REQUIRES_NEW:
@TransactionalEventListener(phase = TransactionPhase.AFTER_COMMIT)
@Transactional(propagation = Propagation.REQUIRES_NEW) // <--- Required to open a new DB transaction!
public void createWelcomeCoupon(UserRegisteredEvent event) {
    // The main transaction has already committed/closed.
    // Without REQUIRES_NEW, any save() call here will be ignored or throw an exception.
    couponRepository.save(new Coupon(event.getUserId()));
}
I have a question about @TransactionalEventListener. If it's called from within a @Transactional method and the @TransactionalEventListener throws an exception, will the transaction be rolled back?
The question is NO. Because the default of @TransactionalEventListener is AFTER_COMMIT. If you want to rollback, you can use @TransactionalEventListener with BEFORE_COMMIT OR use @EventListener on 1 thread and 1 transaction.
Since @TransactionalEventListener(phase = AFTER_COMMIT) is typically executed after the transaction has already been committed, if the listener fails, the database transaction cannot be rolled back. Therefore, you should:
- Wrap the listener logic in a try-catch block to handle exceptions properly.
- Log the error and send alerts for monitoring OR write into database
OR you can use Outbox Pattern.
Khi nào nên dùng cách nào?
Dùng @Async + @TransactionalEventListener khi:.
- Hệ thống Monolith hoặc Microservices vừa và nhỏ.
- Mức độ quan trọng của Event ở mức trung bình: Nếu hy hữu mất 1-2 event khi crash server thì hệ thống vẫn chịu đựng được, hoặc có luồng sync lại bù sau (Reconciliation).
- Tác vụ nhẹ: Gửi Mail chào mừng, gửi Notification Push, xóa Cache, tính điểm thưởng...
- Cần triển khai nhanh, không muốn tốn chi phí quản lý bảng phụ và Scheduler.
BẮT BUỘC dùng Outbox Pattern khi:
- Kiến trúc Distributed Microservices / Event-Driven Architecture chuẩn mực.
- Event có tính giao dịch tài chính / cốt lõi: Trừ tiền, tạo Đơn hàng, trừ Tồn kho, đồng bộ dữ liệu giữa các Service qua Kafka/RabbitMQ.
- Cần đảm bảo Dual-Write Consistency: Hoặc là cả DB và Queue đều nhận được dữ liệu, hoặc không bên nào cả.
- Độ phức tạp: Trung bình - Khó (Phải tạo bảng, viết Scheduler/Worker, xử lý Lock, Retry, Idempotency).
- Hiệu năng & Độ trễ (Latency): Độ trễ phụ thuộc vào tần suất Scheduler (ví dụ: quét mỗi 1s - 5s).
Nếu bạn chọn Outbox Pattern, có 2 lưu ý "xương máu":
-
1. Vấn đề Duplicate Message (At-least-once):
Scheduler hoàn toàn có thể bắn 1 Message 2 lần vào Queue (ví dụ: Bắn xong vào Queue nhưng chưa kịp update DB Outbox thì bị crash). Do đó, Consumer phía nhận Message BẮT BUỘC phải xử lý Idempotency (kiểm tramessage_idđã xử lý chưa trước khi chạy). -
2. Thay vì dùng
@Scheduledquét DB (Polling):
Nếu traffic lớn, việc@ScheduledgọiSELECT * FROM outbox WHERE status = 'PENDING'liên tục sẽ gây nghẽn DB.
👉 Giải pháp nâng cao: Dùng CDC (Change Data Capture) như Debezium để đọc direct từ WAL/Binlog của DB (PostgreSQL / MySQL) và push thẳng vào Kafka mà không cần viết code Scheduler.
3. Khi nào KHÔNG NÊN dùng Event?
Không nên lạm dụng Event-Driven trong các trường hợp:
- Trong cùng 1 Microservice / 1 Database: Nếu chỉ cần xóa dữ liệu ở 3-4 bảng liên kết trong cùng 1 DB, hãy dùng @Transactional của JPA/Hibernate. Việc bắn Event nội bộ chỉ làm phức tạp hóa hệ thống một cách không cần thiết.
- Yêu cầu tính nhất quán tức thì (Strong Consistency): Cần đảm bảo dữ liệu ở tất cả các bảng phải mất ngay lập tức tại thời điểm API trả về response (ví dụ: các giao dịch tài chính, kho hàng chính xác).
- Hành động có thể Rollback trực tiếp từ người dùng: Dùng Event xử lý phân tán làm việc Rollback (Saga Compensating Transaction) cực kỳ phức tạp. Nếu quy trình xóa yêu cầu tương tác phản hồi lỗi ngay cho người dùng ("Không thể xóa vì còn dư nợ"), hãy dùng Synchronous Call (REST) để validate trước.
- Luồng xử lý đơn giản, hệ thống nhỏ: Nếu hệ thống chưa đủ lớn, việc dựng Kafka/RabbitMQ chỉ để xử lý vài tác vụ xóa sẽ làm tăng chi phí hạ tầng và vận hành (Overengineering).